

Main Adjustment
The Main Tension adjustment is located at the top of the embroidery machine, under the pre-tension adjustment. Please see Figure X above.
1. To ensure the main tension is adjusted properly, it is recommended that 3 to 4 of the brass threads are showing (inside the main tension screw). This tension adjustment can change in order to fine-tune your work. In order to tune it accurately, you should see 1/3 bobbin on the back of your work, and 2/3 should be the color you are sewing. To test, simply set up solid colored letters on each of your needles. 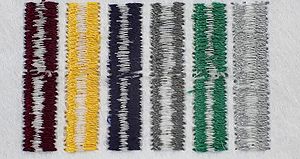
2. If all of the needles are not producing the desired result, your bobbin adjustment is probably incorrect. Please refer to the bobbin adjustment (insert link to bobbin section) section to correct this.
3. If the results are varied, please follow the steps below. If you have one needle that is producing the desired results, you can use this as a gauge to set the other main tension adjustments.
| a. Too much color, not enough bobbin: you will need to tighten the main tension adjustment (turn the main tension adjustment to the right). b. Not enough color showing (too much bobbin showing): you will need to loosen the main tension adjustment (turn the main tension adjustment to the left |

Get all your Garment ink, parts and supplies at Garmentprinterink.com